Salted Peanut Butter Fudge

10462686_10152596751699388_4582697116285660709_n

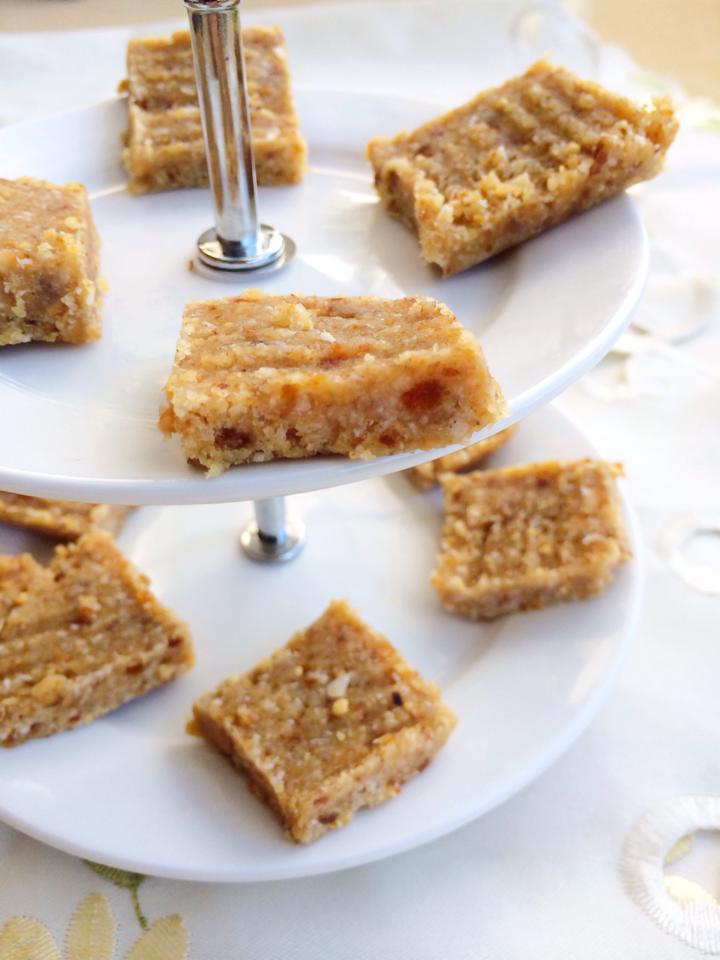
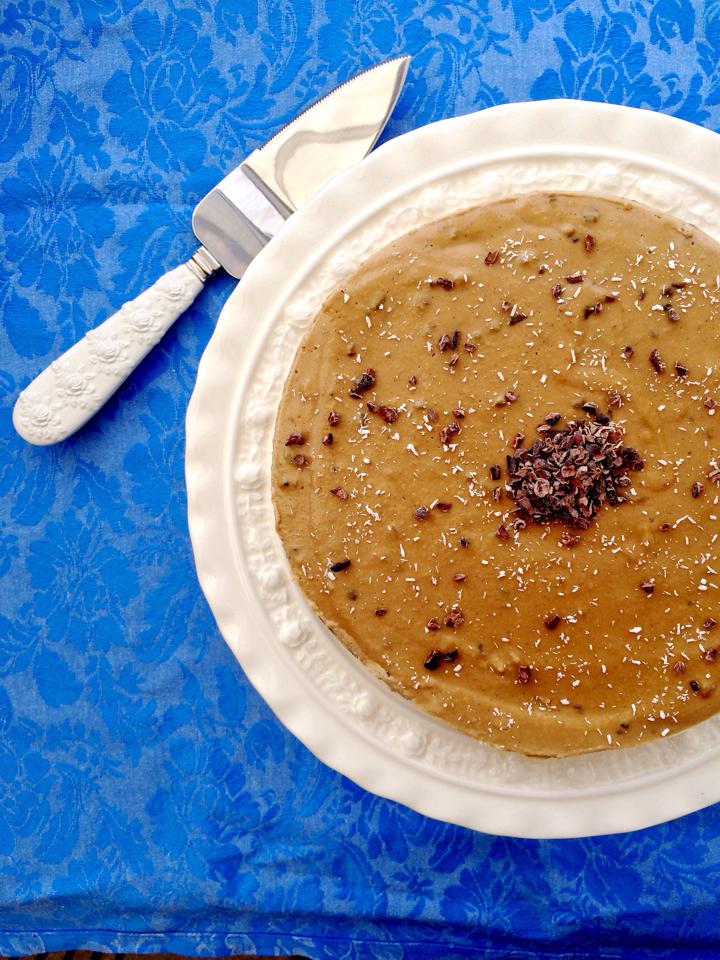
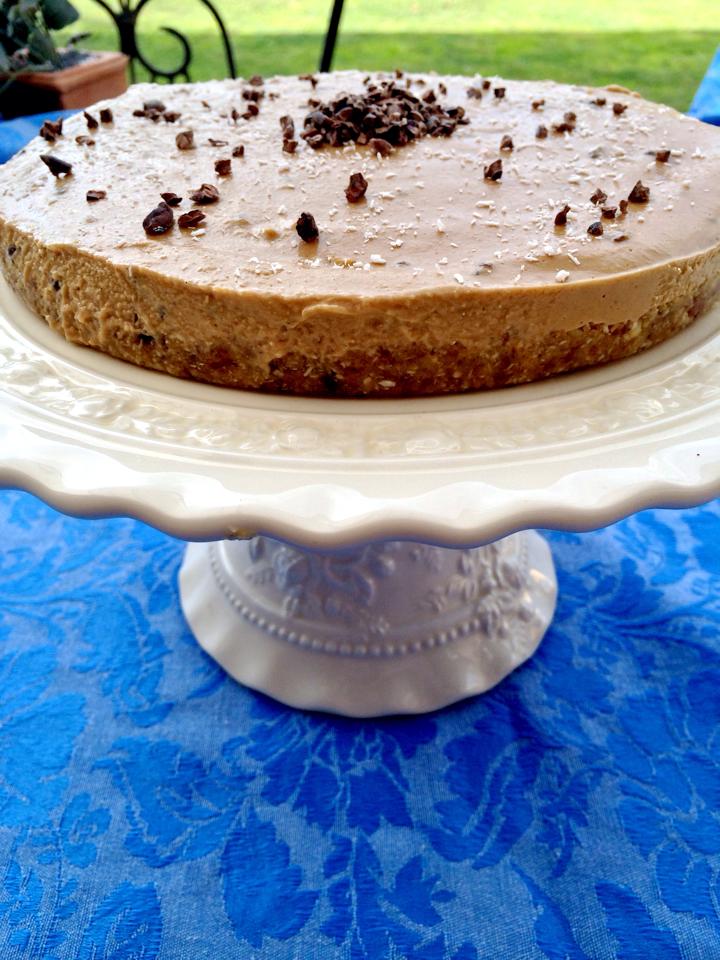
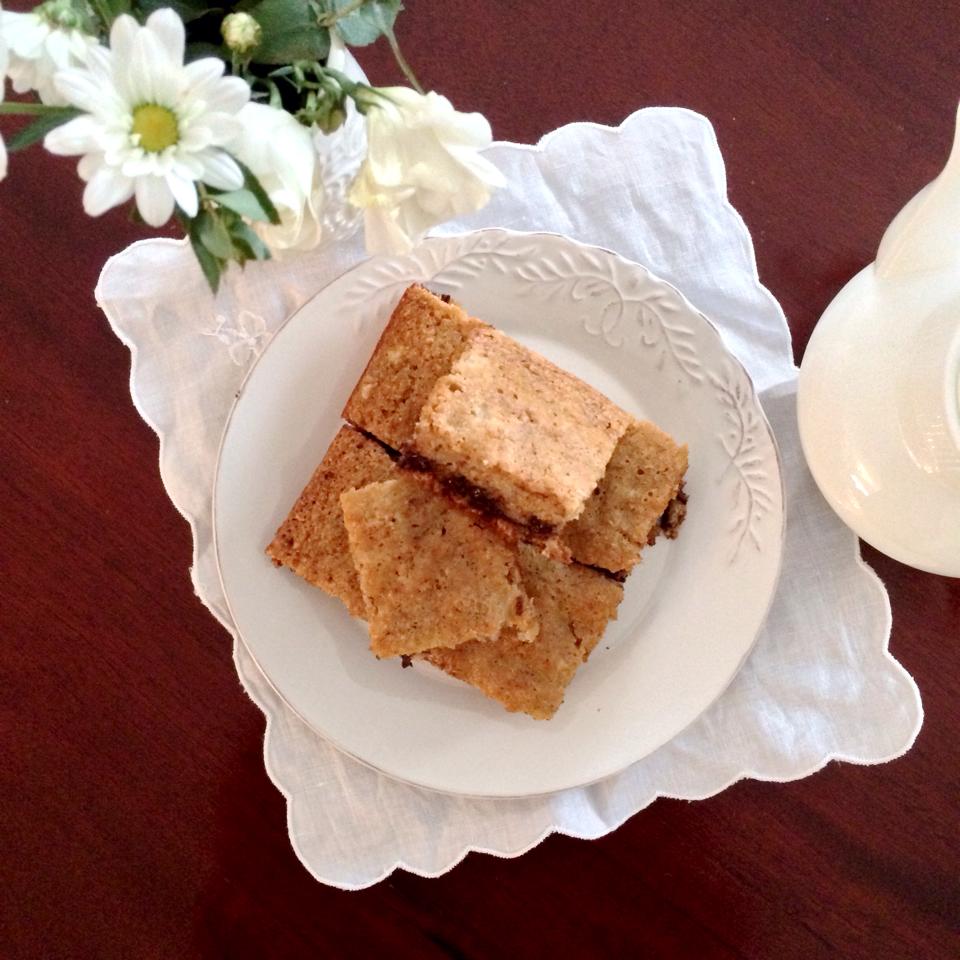
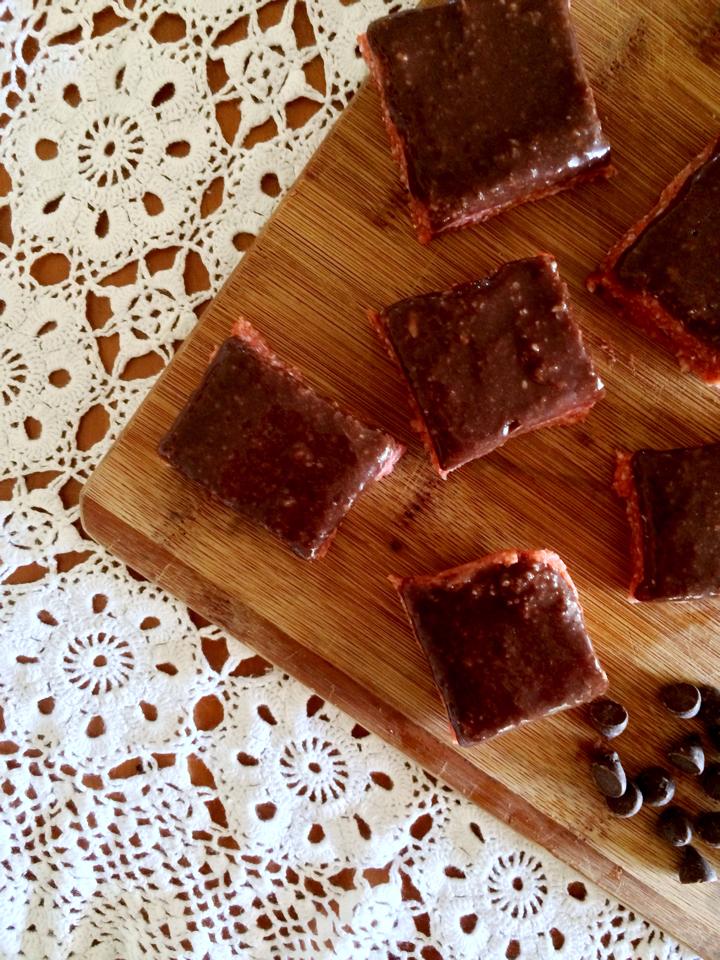
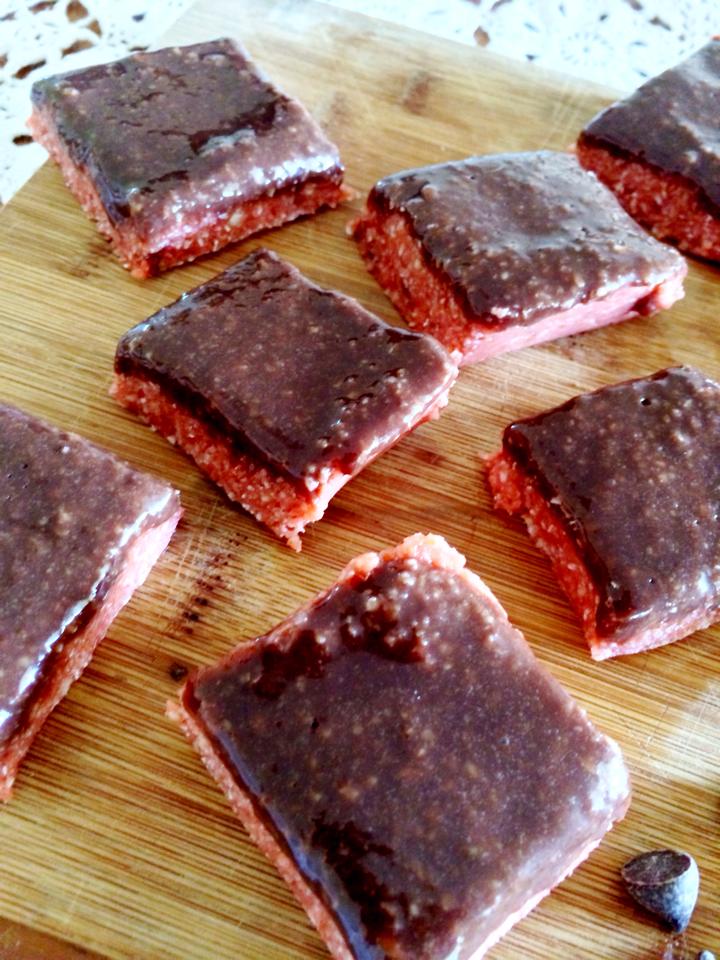
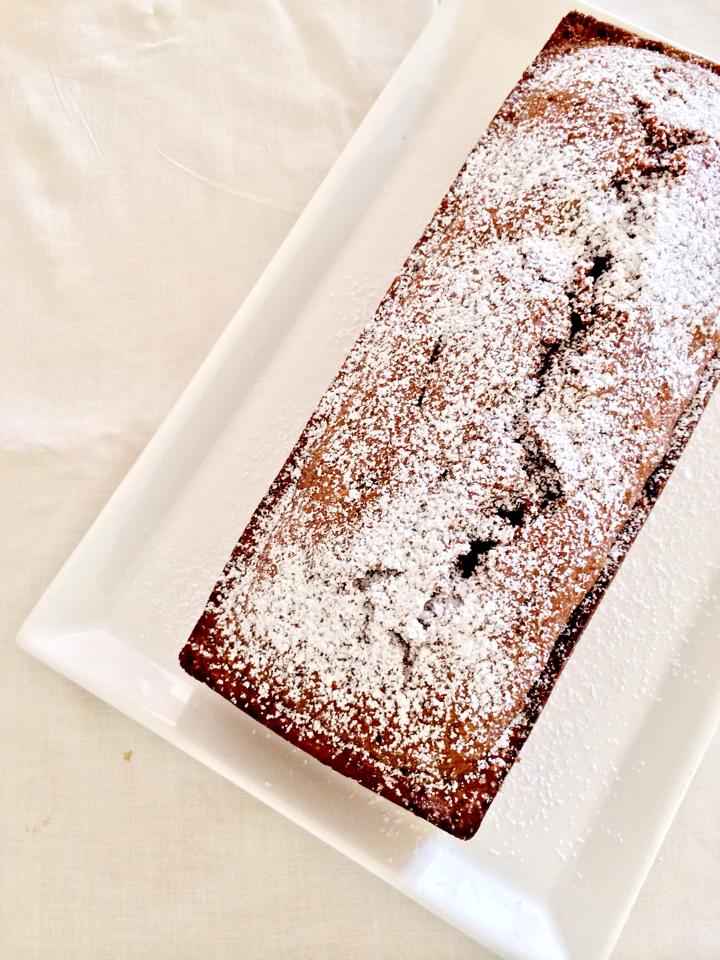
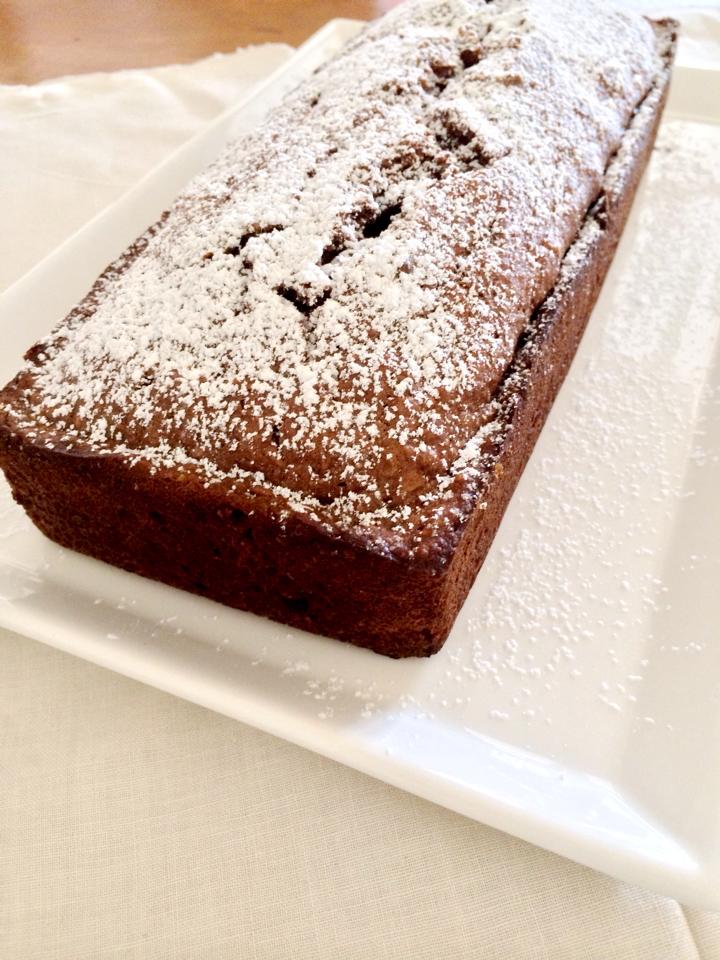
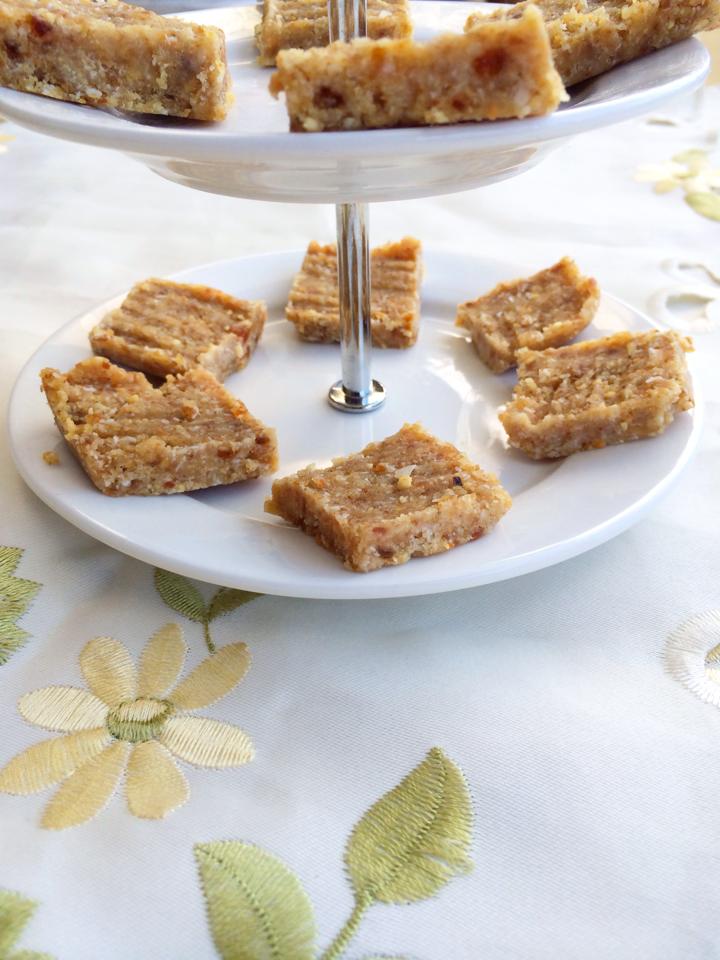
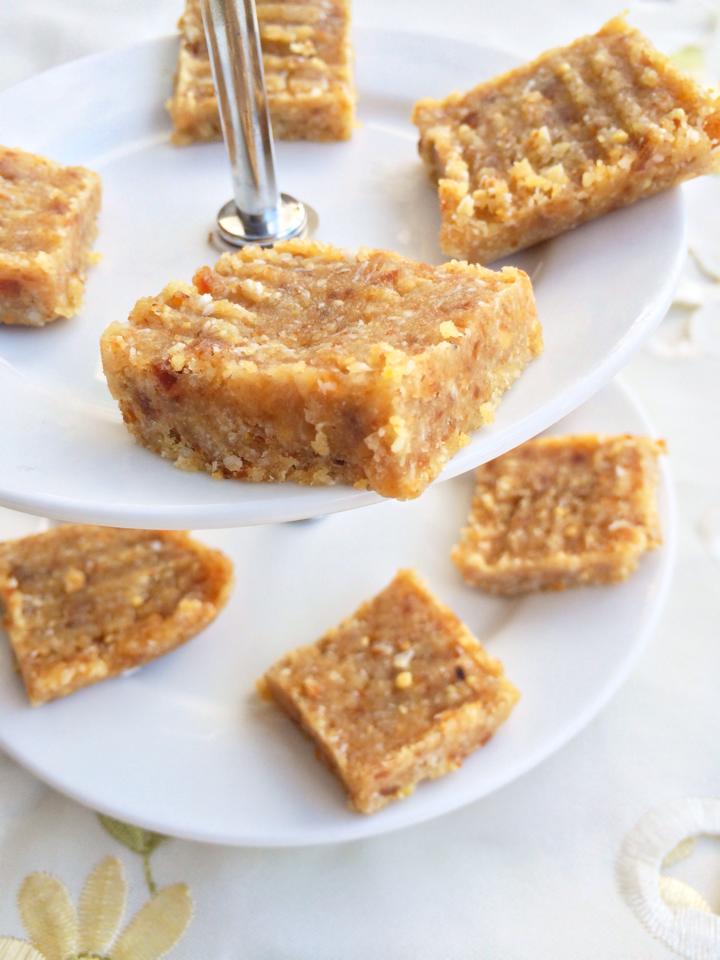
Similarly to my previous post a few weeks back; the abundance of Europe photos posted by my friends on numerous social media channels has sparked my most recent creation of Salted Peanut Butter Fudge. In Barcelona (here we go…) one of my favourite attractions was the darling fruit market La Boqueria. Each day, my best friend and I would relax on the beach at Port Olympic and grab a few juices and pieces of fudge for the trek to the hotel.  This fudge was my absolute favourite (probably because Barcelona is also one of my absolute favourite destinations) and fudge will forever hold a close place in my heart.

Now that I have my blabbering ‘trip down memory lane’ out the way, I can focus on more relevant content about this delicious little piece of fudge. I recently saw a yummy recipe by I Quit Sugar and it looked so damn good that I needed it in my belly (although mine is quite different to the original). I love peanut butter and I love fudge. And this recipe is ridiculously easy – give it a go!

10487303_10152596830819388_7427336983323395675_n

10470919_10152596751759388_8198805148938649078_n

INGREDIENTS

1 cup walnuts

10 pitted dates

1 cup desiccated coconut

1 tbls rice malt syrup

1 tbls coconut oil (I use Coconut Revolution)

1 heaped tablespoon of natural peanut butter

A large pinch of salt

1 tbls coconut sugar


METHOD:

  • Soak dates in hot water for 2-3 minutes.
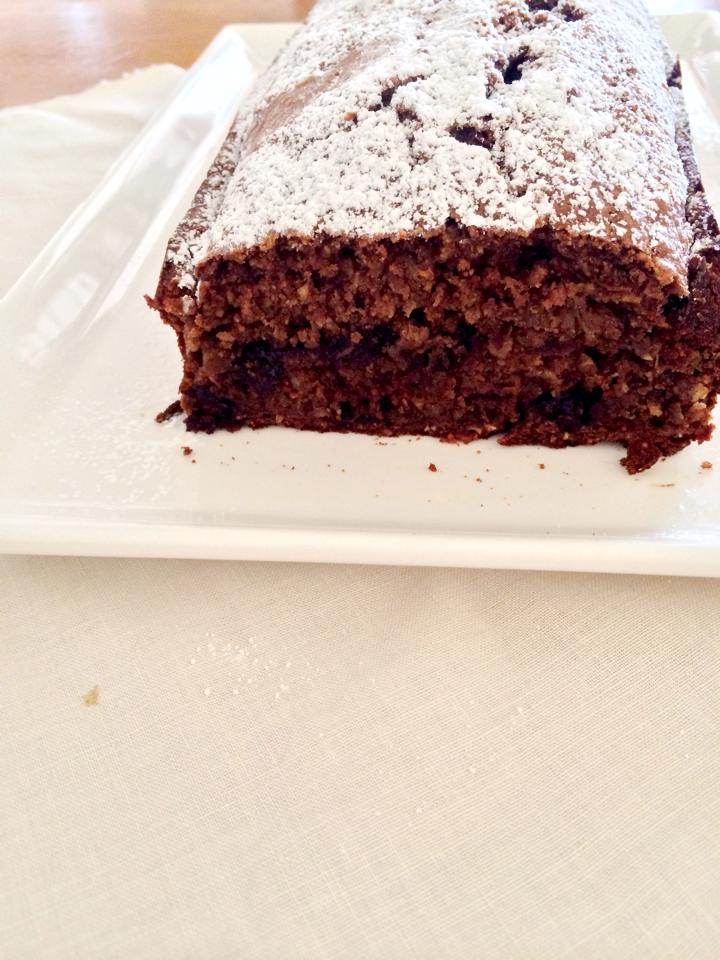
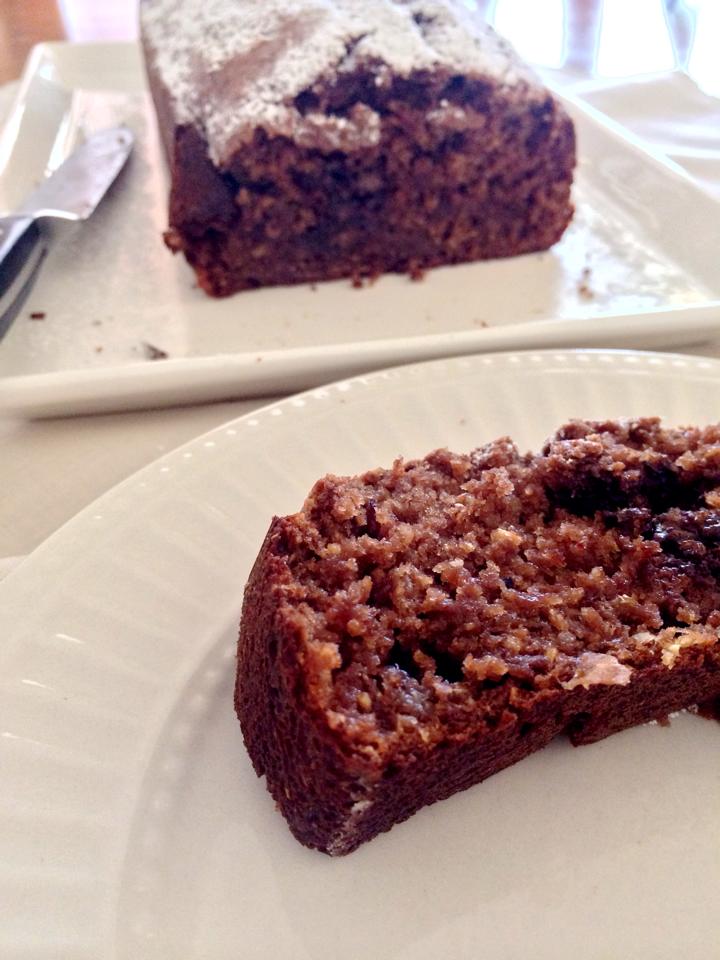
  • Process walnuts until fine and then add dates.  Add remaining ingredients and process thoroughly until mixture sticks together.
  • Spray a small baking pan with baking spray and place mixture in evenly using your hands. If mixture is sticky run your hands over hot water and press lightly with a fork for grooves in the fudge. Place in the freezer for around 1  – 2 hours and cut up and serve! Leave leftovers in the fridge or freezer – so yummy!

10325523_10152596830709388_6815086845131840601_n


Superfood Cacao and Goji Berry Truffles

10436206_10152579852239388_8715313916518256970_n

Ahh the winter blues, or should I say, the winter flu? There’s nothing worse than feeling ill on a chilly Melbourne Sunday, so it’s best to fill your body with nutrients and eat foods that help boost your immune system.  If you’re one of the lucky ones living in a sunny place, don’t worry – these truffles can still be enjoyed while fanning yourself on a sunbed.

Cacao and goji berries are two superfoods with real super powers. I won’t go into the nitty gritty; but cacao helps protect your nervous system and goji berries are rich in antioxidants, making these truffles something your body will thank you for! Oh, and feel free to add some chia seeds to this recipe also for more yummy benefits – give them a go!

PS. Only 63 cal per ball!

10336673_10152579851944388_166327187258744347_n

10494659_10152579851639388_9199761320072234916_n (1)

INGREDIENTS

7 pitted dates

1 cup walnuts

1 tbls coconut oil (I used Coconut Revolution coconut oil)

1 tbls cacao

1/2 tbls hazelnut spread (you could also use almond spread)

½ cup desiccated coconut

3 tbls rice malt syrup

½ tsp vanilla bean paste

¼ cup goji berries

Chia seeds optional


METHOD

  • Spray a baking pan with baking spray.
  • Soak dates for 5 minutes in hot water and process walnuts until fine.
  • Add all other ingredients except goji berries including dates and process. Mix through goji berries lightly.
  • Roll mixture into small balls and cover with extra coconut. Pop in the fridge for an hour and enjoy!

10402827_10152579852099388_3053315898315653233_n

Hot Nutella and Banana Crepes

10389183_10152565310559388_2652516130979613781_n

It’s that time of year where everyone around you is embarking on a journey to Europe. My time was two years ago and one of my favourite memories was ordering Nutella Crepes after a very long night out in Mykonos in the local village. Walking on the white cobbled stones through the town full of excited youths at 7am to find an ice cream shop serving crepes wasn’t a difficult task to say the least. Since I’m unfortunately staying put this European summer (or should I say, Melbournian winter) I thought it would be a great idea to recreate my go-to meal in a clean version for old time’s sake.

These crepes are light, easy (3 ingredients only!), and delicious! You can fill them with whatever you please, but since I’m reminiscing about my trip to the Greek Islands I opted for Nutella and banana (clean, of course)! Give them a go; you might even be transported back to Greece 😉

10435842_10152563737469388_7839561962356187052_n

10416661_10152563737349388_5884023906185765764_n

INGREDIENTS

Crepes:

½ cup rolled oats

½ cup almond milk

1 egg


Hot Nutella:

4 pitted dates

2 tbls coconut oil

2 tbls rice malt syrup

1 tbls hazelnut spread

2 tsp cacao

¼ cup water

1 banana


METHOD

For crepes:

  • Process oats well until oat flour is formed.
  • Add almond milk and egg to flour and blend together or mix well.
  • Spray pan with coconut oil and pan fry each side of the crepes evenly; the sides of the crepe will begin to rise when ready to be flipped. Set crepes aside while you prepare Nutella.

For hot Nutella:

  • In a pot, melt coconut oil and stir through dates, water, rice malt syrup, hazelnut spread and 2 teaspoons of cacao. While the dates heat up begin crushing them with a spoon or potato masher until smooth. Add water if mixture is too thick.
  • Pour Nutella in the centre of the flat crepes and top with chopped banana. Fold over both sides of the crepe and sprinkle coconut and cacao nibs on top for decoration and enjoy!


*Recipe adapted from Live Laugh Eat


10306237_10152563737034388_1417155972170439259_n

Raw Coffee and Cacao Nib Cheesecake

10389438_10152551358439388_4906823594771200882_n

Sorry I haven’t been posting as frequently as usual; I have been quite busy working on an exciting new blog post for a website showing the calorie differences between my desserts and unhealthy desserts – and there is quite a significant difference –  stay tuned!

Back to cheesecake – I mean, who doesn’t love cheesecake? It’s the best. And the fact that you can whip up a raw/vegan one makes it even better! I’m not a big coffee drinker (I know, I know, I live in Melbourne so drinking coffee regularly is mandatory), but I love combining the bean in desserts for that creamy taste and tiny energy boost! This recipe is very simple and tastes divine. It’s also very pretty so perhaps save this one for entertaining those snooty house guests! Enjoy!

PS. I used cacao nibs and coconut sugar for this recipe which can be found at your local health food stores (these ingredients are not available at grocery stores) but you may also use extra rice malt syrup and dark chocolate chips if a health food store is unavailable to you.

10432472_10152551359814388_7887639031991249881_n

10371639_10152551360119388_3221001465918257788_n

10458860_10152551360329388_372037493237687937_n

INGREDIENTS

Base:

2 cups walnuts

½ cup desiccated coconut

10 pitted dates

2 tbls rice malt syrup


Coffee and Cacao Nib Cream:

1 ½ cups soaked cashews (for 1-2 hours)

2 tsp instant coffee

¼ cup coconut sugar

½ cup desiccated coconut

1/3 cup rice malt syrup

¼ cup almond milk

2 pitted dates

2 tbls coconut oil

1 tsp vanilla bean paste

¼ cup cacao nibs or dark chocolate chips


METHOD:

For base:

  • Spray a circular baking pan with baking spray.
  • Soak dates for 5 minutes in hot water and process walnuts until fine.
  • Add all other ingredients including dates and process.
  • Press mixture down evenly into baking pan and pop in the freezer while you prepare the cream.

For Coffee and Cacao Nib Cream:

  • Blend soaked cashews with almond milk until a creamy texture is formed.
  • Boil water and mix 2 teaspoons of instant coffee in an espresso cup and pour into blender.
  • Add remaining ingredients except cacao nibs and blend until combined well.
  • Stir through cacao nibs lightly and pour on top of the base evenly. Pop in the freezer for 3+ hours and it’s ready to be served. Decorate with desiccated coconut and cacao nibs – enjoy!

10363846_10152551360184388_1623553624802606437_n

Guilt-free Nutella Pizza

OK, I know I always say this but seriously, everyone needs to get out their blender and make this Nutella NOW! I have tried countless recipes from numerous sources for a clean Nutella and always find myself disappointed. I’ve also experimented with my own Nutella recipes and they’ve also been unsuccessful, but this… THIS is Nutella. Trust me. I had almost given up on this creation as it took months of hard work (OK, a little exaggeration), but I am honestly startled by the result. This will be the closest taste to Nutella you could ever possibly get without actually eating Nutella.  It’s chocolate. It’s hazelnut. And it’s spreadable on whatever you like. You can eat it with a spoon, on your bread, or on a pizza. TRY IT NOW!

Sorry to bore you with my excitement, back to the pizza… this recipe is for a Nutella pizza with strawberries, need I say more? There shall be no need to order this at a restaurant when you can eat it GUILT FREE in the comfort of your own home – enjoy!

10398070_10152530411874388_3040425828060021003_n

10390415_10152530410569388_5763028662308428851_n

INGREDIENTS

Pizza                                                                                                   Nutella

2 cups wholemeal or whole wheat flour                             1 cup pitted dates

3 tbls olive oil or coconut oil                                                  1/3 cup coconut oil

3 tbls wine (optional)                                                                 1/3 cup rice malt syrup

1 egg                                                                                                   ¼ – ½ cup water

½ cup almond milk                                                                     3 – 4 tbls hazelnut spread

½ cup water                                                                                   2 tbls cacao


For decoration:

Strawberries

Goji Berries

Vegan chocolate chips

METHOD

For pizza:

  • Preheat oven to 200°C  and spread oil of choice onto a flat pizza tray
  • Combine all ingredients lightly in a bowl while folding the dough.
  • When the dough is firm but soft, dip your hands in hot water and spread out the dough on the pizza tray into a circle shape and pop in the oven for around 15 minutes.

For Nutella

  • Soak dates in hot water for 2-3 minutes and pop in the blender with ¼ cup of the water used to soak them.
  • Blend all other ingredients with the dates until a paste is formed. If you prefer more hazelnut taste – add more hazelnut spread. And if Nutella is too thick add some water.
  • Spread over the pizza and decorate with strawberries, goji berries and chocolate chips. My goodness this is good. Enjoy!

10169373_10152530410784388_7529938455048858244_n

Banana and Chocolate Blondies

10314653_10152516803594388_4258002553536612902_n

YUM, these are so good! This recipe was actually substituted from my Mother’s chocolate and banana muffins recipe (containing lots of sugar/butter) and I switched the original ingredients with healthier options such as coconut oil and rice malt syrup. To be honest, these taste just as good if not better – especially knowing they’re guilt free! My Mother even said this is her absolute favourite recipe to date. A VERY big call. And I would definitely agree, even though I know I say that about everything I make (I can’t help it, they taste so good!)

The texture of these blondies is truly perfection when not overbeaten (a bad habit of mine), make sure you beat this mixture very lightly for the ultimate blondie fluffiness! Banana and chocolate is always a winning combination, but when you add a teaspoon of cinnamon it becomes even better. Hope you enjoy!

10373806_10152516802894388_3848293880048519545_n

1907986_10152516802834388_7095594485679461571_n

INGREDIENTS

2 cups wholemeal or whole wheat flour (gluten free flour will also work)

2 tsp baking powder

1 tsp cinnamon

1 cup rice malt syrup

3 tsp coconut oil

2 mashed bananas

1 cup almond milk

2 eggs

A large handful of dark chocolate chips or cacao nibs.

METHOD

  • Preheat oven to 180°C and line a rectangular baking pan with baking paper.
  • In a large bowl, mix all the dry ingredients lightly except dark chocolate chips.
  • In a separate large bowl, combine all the wet ingredients together until mixed well and add to dry ingredients. Mix lightly and fold chocolate chips through.
  • Pour mixture into baking pan and place in oven for 25 minutes.Let cool and serve hot or cold (I love this hot!) and you have the perfect blondies – yum!

10373839_10152516803304388_8122041693969212670_n

Cherry Ripe Fudge Bars

10416584_10152508738664388_1638470223884012495_n

Mmm Cherry Ripe – the perfect winter chocolate. I’ve been suggested to create this a few times and finally decided to give it a go. As I have mentioned previously (and in my About Me), I have quite an unhealthy obsession with chocolate.  Cherry Ripe is one of those bars that when you begin with one bite you struggle to say no and this usually leads to a guilty sensation which sounds a little like “oh my gosh what have I done?!”

This recipe is officially my new favourite. You can eat as much as you please and these slices are surprisingly light yet still hit the chocolate-craving spot.  The fudgy texture is perfect with the chocolate topping and tastes scarily similar to a Cherry Ripe bar (though I’m not complaining). Try for yourself!

10292236_10152508739089388_8674884314233369525_n

10383515_10152508738859388_5020615422074299653_n

INGREDIENTS

Fudge:                                                                           Chocolate Topping:

1 cup almonds                                                             ½ cup shredded coconut

10 pitted dates                                                            2 tbls rice malt syrup

2 cups shredded coconut                                          1 heaped tsp cacao

1/3 cup rice malt syrup                                              3 tbls water

½ cup cherries

A few drops red food colouring


METHOD:

For fudge base:

  • Soak dates in hot water for 2-3 minutes.
  • Process almonds until fine and then add dates.  Add remaining ingredients and process thoroughly until mixture sticks together.
  • Spray a small baking pan with baking spray and place mixture in while pressing evenly using your hands. If mixture is sticky run your hands under hot water to press down mixture and place in the freezer while you prepare chocolate topping.


For chocolate topping:

  • Process coconut with rice malt syrup until very fine. Add remaining ingredients and process until coconut is not visible in the mixture.
  • Pour over the cherry ripe fudge evenly and pop in the freezer for 2-3 hours. Yum!

10336649_10152508739204388_4187870323388829815_n

Polenta and Chia Vanilla Porridge with Cinnamon Poached Pears

10320412_10152504421399388_1179441992968091734_n

Polenta porridge?! OK, I know what you’re thinking… but trust me this porridge beats oats any day! So where on earth did I get this idea? Basically a few months ago I hesitantly ordered a polenta and chia porridge at a charming café in Melbourne.  I say hesitantly because I was extremely sceptical of my menu decision and knew it could go one of two ways; I would either hate it or love it. And I LOVED it!

Melbourne is slowly easing into winter and what better way to get ready for the chilly season than with a divine breakfast option to warm the soul before you take on a cold winter’s day!  Pears are also in season at the moment (yay!) so I poached these with a cinnamon stick to enhance the flavour and truly make your creamy porridge even tastier – yummy!

10369178_10152504421949388_2622708082661232980_n

10342505_10152504422064388_503400989554543962_n

INGREDIENTS

Polenta and Chia Porridge:                                                    Poached pears:

2 cups almond milk                                                                   1 chopped pear

½ cup polenta                                                                             2 cups water

2 tbls chia seeds                                                                         1 cinnamon stick

¼ cup maple syrup or rice malt syrup                             2 tbls maple syrup or rice malt syrup

½ tsp vanilla bean paste

METHOD:

  • Place water, cinnamon stick and maple syrup in a saucepan on low heat until water is heated.
  • Chop the pear in halves and continue cutting each half piece of pear in half. Pop in the saucepan and cover for 15-25 minutes on low heat while you prepare the porridge.
  • In a separate saucepan, add milk and place on low heat until nearly boiled (small bubbles will appear on the surface).
  • Add polenta and chia seeds and stir for 5 minutes until thick and creamy.
  • Add rest of porridge ingredients and stir through. Pour porridge into bowls and drain the pears and place on top. Decorate with a cinnamon stick and enjoy!

10391036_10152504421159388_637214618433635798_n

Banana, Peanut Butter and Chocolate Tea Cake

10170992_10152495998664388_4156241102741619547_n

So as you may notice in my recipes I have quite the obsession at the moment with peanut butter. On its own – I’m not the biggest fan – however combined in cakes, cookies or bars and that’s a WHOLE different story. In fact, last night my sister and best friend came over solely to watch movies while devouring my Chocolate and Peanut Butter Bars (link in Recipes page). And we would have consumed more if we had made a double batch (damn it!) and so the idea came this morning to bake a tea cake with peanut butter somehow included…

The delicate taste of peanut butter amongst the soft, moist chocolate cake makes a fantastic team with the small hint of banana. This darling cake is best served hot, with a steaming tea or for entertaining your house guests; they won’t even know it’s healthy – promise!  I also added a handful of dark chocolate chips through the mixture but you could also opt for cacao nibs or sugar free dark chocolate.

10365907_10152495998254388_4769050990280125475_n

10330421_10152495998574388_2652725330007806488_n

INGREDIENTS

1 ½ cup wholemeal or whole wheat flour

½ cup rolled oats

1 tsp baking soda

1 tsp baking powder

2 tbls cacao

1/3 cup coconut oil

1/3 cup rice malt syrup

2 mashed bananas

2 eggs

1 cup almond milk

1 heaped tablespoon peanut butter (I used Mayvers Peanut Butter and Cacao Spread)

10 pitted dates

A handful of dark chocolate chips or cacao nibs


METHOD

  • Preheat oven to 180°C and line a rectangular baking pan with baking paper.
  • In a mixer (or large bowl) mix all dry ingredients including cacao. Then add almond milk and eggs in alternating batches.
  • Place dates in a pot with about ¼ cup of water on medium heat and mash dates to form a thick liquid.
  • Add mashed dates, mashed bananas, rice malt syrup, peanut butter and melted coconut oil to mixture and combine well.
  • Mix chocolate chips through mixture with a spoon lightly and then pour mixture into baking pan and place in oven for around 50 minutes.
  • Let cool and serve with sifted icing sugar on top. Yum!

10346658_10152495998354388_6561954433670365348_n

Raw Jaffa Truffles

10305504_10152488068189388_985634030696705527_n

Chocolate and orange is one of the most fantastic pairs. It may be done subtly or rich, but you know it will always taste equally delicious. Jaffa chocolates are one of my favourites and I can eat them to extremes (as with other chocolate of course) so when I was suggested to make something ‘Jaffa’ I was intrigued to see how it would turn out; especially as I haven’t come across many healthy Jaffa recipes.

These yummy truffles are rich with a light orange flavour. When you initially bite into these tiny treats, the cacao hits your tongue and is then replaced with a beautiful orange and chocolate tang as the cacao melts into the truffle base. The small Frangelico inclusion in the mixture also provides the chocolate component to give these truffles the true Jaffa taste. These are super easy, fast and very delicious – give them a go!

PS. The truffles appear more orange than the photos when you make them!

1554453_10152488067364388_9206323235931376837_n

10337742_10152488067829388_2092129057243207413_n

INGREDIENTS

12 pitted dates

1 cup almonds

2 tbls coconut oil

1/3 cup rice malt syrup

1 cup (or more) shredded coconut

1 tbls Frangelico

1 tsp orange essence

A few drops orange food colouring

A small bowl of cacao (around 1/3 cup)

METHOD

  • Soak dates for 5 minutes in hot water.
  • Process almonds with ¼ cup of water until fine. Add dates with another ¼ cup water and process until almonds and dates are both completely crushed and combined together.
  • Add all other ingredients and process well. If the mixture is a little thin and not pressing together, add more coconut.
  • Roll mixture into small bowls about 1 teaspoon each and then cover in cacao. Repeat this until all mixture is formed into little truffles and pop into the fridge for around 4 hours. Yum!

10329314_10152488067534388_2724075769767331182_n